


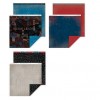
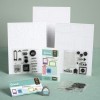
Aren't these adorable! I love making these simple yet adorable Mini Pocket Albums for quick gifts for friends and family as well as Workshop projects! I am joining in on the Color My Heart: Color Dare #82 and FCCB Challenge #199 All About You this week with my Mini So Blessed Pocket Album above. Focus colors are Goldrush and Topiary and I used both the Arbooking and the Artiste Cricut Cartridges on these projects to cut out the elements for the covers as well as the tags that are inserted in the pockets.


This Mini Pocket Album is held closed by a simple piece of Baker's Twine that is secured under a 1-1/2" strip of paper attached as the binding with Scor Tape.
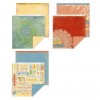
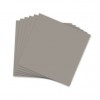
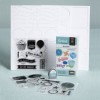
There are 8 pocket pages with tags for journaling or mounting photos. It is so simple to create these albums using a single piece of 12x12 cardstock or B&T paper. For this one I used a 12x12 piece of B&T paper from the Jubilee and Pro Player paper packets. I score the paper one one side at 3", 6" & 9". I rotate the paper 90 degrees and score at 2", 6" & 10". Now I cut on the 6" score line up to the 9" score line, leaving 3 inches un-cut.
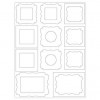
 | |
| Diagram with cuts and score lines. |
Now for the folding....along the cut I fold, then on the 2" score lines on each side, I fold those up to create a pocket. Next I use Scor Tape again to secure these pockets and also on the inside part of the folded section. Now fold each section towards the center and you have your Mini Album. Attache a 1-1/2" strip of complementary B&T paper, to the end to create a binding, attaching an 18" piece of Baker's Twine under it to create a closure. Now decorate as desired with additional papers, bling and decorative elements.
Here is a quick tutorial on how to score, cut and assemble the Mini Pocket Album.
Well thanks for stopping by. Please leave a comment, I truly appreciate ready your comments.
In the meantime, Happy Paper Crafting!
~Angelina


I love your mini-albums, Angelina. Thanks for posting the directions. I'm going to have to try a few myself! Hope you had fun with the Color Dare this week. Come back soon!
ReplyDeleteThank you Gretchen, they are so fun and easy to make. I look forward to seeing what you come up with. I have a friend coming over to make a few of these for gifts!
DeleteGreat job on the mini albums! Your directions are very good, too. Thanks for joining us at Color My Heart this week.
ReplyDeleteThank you Michelle. I am glad that the directions were good. You never know with that. That is why I try to include a video tutorial. I missed this week's challenge by a day, dang it! Oh well, hopefully I get it together for Wednesday's upcoming challenge. Have a wonderful day.
DeleteThese are great mini albums, and what a super way to get the most out of your paper! Thanks for joining us at FCCB this week!
ReplyDeleteThank you Missy! You are so right and fun project for workshops!
DeleteGreat project and video. I need to try this. Looks like a great way to add room for more pictures on a scrapbook page as well as being a free standing mini-album. Thank you for joining us at FCCB!
ReplyDeleteThank you JoNeita, it really is. You can bang out a bunch of these for gifts too! Love it!
DeleteThat turkey is so cute! Thanks for joining the Color Dare this week.
ReplyDeletethese are super fun love the colors you selected. Thanks for playing with FCCB
ReplyDeleteFun little mini's. Thanks for sharing your tutorial. Will have to give this a try. Thankd for joining the challenge at FCCB this week. Kim
ReplyDeleteThanks so much Kim!
Delete