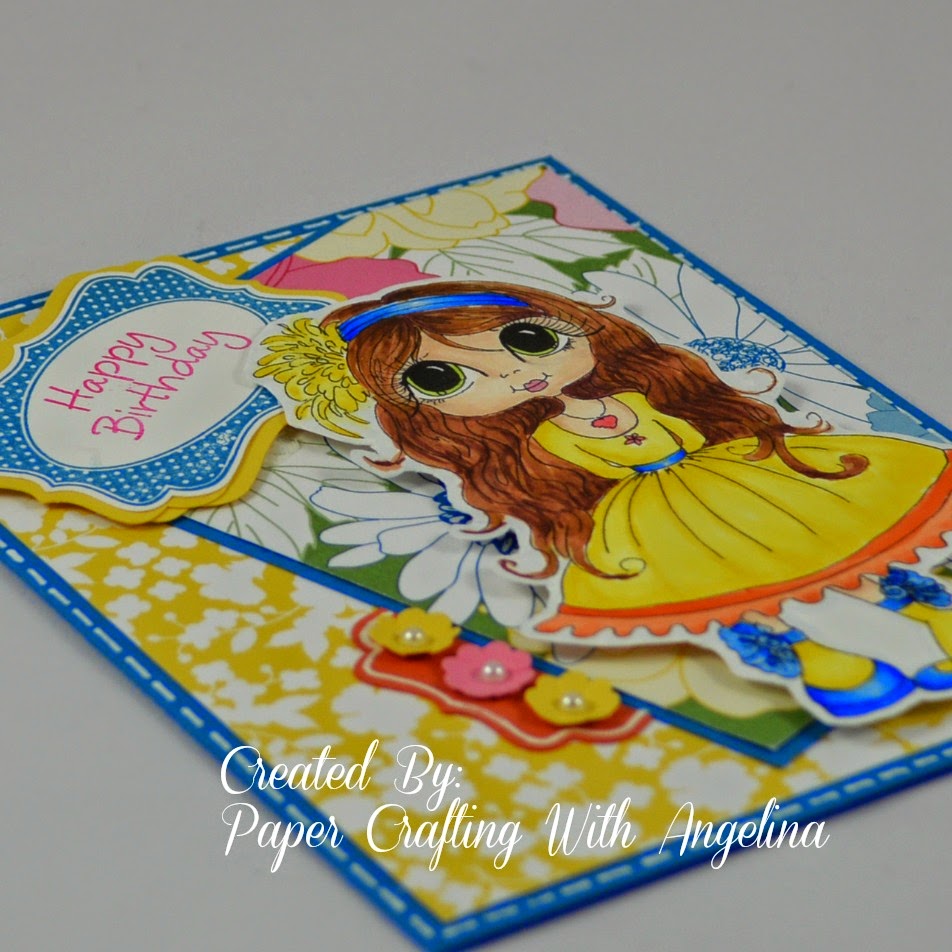
Recently I came upon a called Grandma Bonnie's Place and I fell in love with the My Besties from Sherri Baldy's Etsy Shop! Wow, these Besties are so stinkin' cute and are available both as traditional stamps or digital, I went for the digital version! So what I decided to do is take one of my stock Birthday Cards and bump it up a knotch with one of Sherri's Besties.
So I removed the sentiment which had been mounted with dimensional tape and repositioned it. I then changed out the deep pink flower with two yellow and one light pink on the lower tab. Lastly, but most definitely not least, I added this adorable Bestie named Ginger.
I colored Ginger with Copics after allowing the ink from my printer to dry. I think I need to practice a bit more, especially on the hair, but all in all, I am very satisfied with this girl.
I would love to hear from you. Tell me what you think.
Have a wonderful 4th of July!
Angelina Romero - I want to share my love of paper crafting! - PaperCraftingWithAngelina@gmail.com - 575.613.8045
Showing posts with label card making. Show all posts
Thursday, July 3, 2014
Thursday, March 13, 2014
How to Use Emboss-Resist Technique with Watercolors
So here is a trending technique that I wanted to share with you. Emboss-Resist with Watercolor. Have you tried it yet? I am loving this technique as a way to create some beautiful backgrounds for my cards.
By using white embossing powder on my watercolor paper I create a 'resist' to the ink used for watercoloring. I really saturate the paper so that the colors that I use will blend well as you can see in the pictures.
For the watercolor I simply used my Exclusive Inks and a brush and applied the ink directly to the watercolor paper. If you would like to see a video tutorial on how I created the card on the left, click on the card above.
I also did a slight treatment to the inside of each card as you can see here.
I hope you enjoy the video and if you have any questions, please don't hesitate to ask! I love helping.
In the meantime, Happy Paper Crafting! ~Angelina
By using white embossing powder on my watercolor paper I create a 'resist' to the ink used for watercoloring. I really saturate the paper so that the colors that I use will blend well as you can see in the pictures.
I also did a slight treatment to the inside of each card as you can see here.
I hope you enjoy the video and if you have any questions, please don't hesitate to ask! I love helping.
In the meantime, Happy Paper Crafting! ~Angelina
Wednesday, March 12, 2014
Simply Beautiful Card Set
I recently had a request for a set of note cards from a dear friend of mine. I have been wanting to make some note cards with the Hostess Set "A Mother's Love" and this was the perfect opportunity!
Each 2-3/4" x 4" card is created with a flower that is slightly different, whether it be the colors or how they were stamped. I used Cotton Candy and Sorbet stamp pads for the flowers and Pear for the leaves. I also used my Pear and New England Ivy alcohol markers for the stems. I double stamped the sentiment to create a shadow.
If you noticed the sparkle on all of the flowers, well I used the Wink of Stella Brush in Clear from Simon Says Stamps! I love this tool for adding subtle sparkle to my projects.
For the box, which holds all four cards and their matching envelopes, I used the Cricut Craft Room along with the Artiste cartridge. The box is found on page 57 and basically I enlarged it until I could see that a 2-3/4" x 4" card would fit (10.944 x 5.667). I then cut it out of a piece of B&T paper from the Lollydoodle Paper Packet. I used a border strip from that paper packet as well and wrapped that around the box. I then stamped the flowers twice on a 2" x 3-1/4" piece of Daisy White cardstock in Sorbet for the background and Cotton Candy for the outline (darker part). I then stamped four leaves in Pear. The center flower was stamped on Cotton Candy cardstock with Cotton Candy ink and then attached with 3-D Foam tape. I wrapped a piece of baker's twine around this panel three times and then tied it in a bow. I then attached that piece of cardstock to a 2-1/4" x 3-1/2" piece from the paper packet with 3-D Foam tape and attached that to the box with adhesive.
My envelopes were created with a piece of heavy-weight copy paper cut to 6" x 6". I then used an envelope punch board at 2-5/8" for the first punch. After assembling the envelopes I stamped them with the same stamps used on the cards using all three colors.
I also did a short video going over how I put this project together. You can watch it below.
Here is just one more variation of this card. On this one I mounted it on a piece of Cocoa cardstock which really frames the focal image. I am submitting this to The Card Concept challenge for this week. I made the following substitutions to their colors: Lime = Pear and Espresso = Cocoa. White is White! I consider this to follow along with their Clean and Layered style.
Thank you so much for stopping by and leaving a comment.
Happy Paper Crafting!
~Angelina
Each 2-3/4" x 4" card is created with a flower that is slightly different, whether it be the colors or how they were stamped. I used Cotton Candy and Sorbet stamp pads for the flowers and Pear for the leaves. I also used my Pear and New England Ivy alcohol markers for the stems. I double stamped the sentiment to create a shadow.
If you noticed the sparkle on all of the flowers, well I used the Wink of Stella Brush in Clear from Simon Says Stamps! I love this tool for adding subtle sparkle to my projects.
For the box, which holds all four cards and their matching envelopes, I used the Cricut Craft Room along with the Artiste cartridge. The box is found on page 57 and basically I enlarged it until I could see that a 2-3/4" x 4" card would fit (10.944 x 5.667). I then cut it out of a piece of B&T paper from the Lollydoodle Paper Packet. I used a border strip from that paper packet as well and wrapped that around the box. I then stamped the flowers twice on a 2" x 3-1/4" piece of Daisy White cardstock in Sorbet for the background and Cotton Candy for the outline (darker part). I then stamped four leaves in Pear. The center flower was stamped on Cotton Candy cardstock with Cotton Candy ink and then attached with 3-D Foam tape. I wrapped a piece of baker's twine around this panel three times and then tied it in a bow. I then attached that piece of cardstock to a 2-1/4" x 3-1/2" piece from the paper packet with 3-D Foam tape and attached that to the box with adhesive.
My envelopes were created with a piece of heavy-weight copy paper cut to 6" x 6". I then used an envelope punch board at 2-5/8" for the first punch. After assembling the envelopes I stamped them with the same stamps used on the cards using all three colors.
I also did a short video going over how I put this project together. You can watch it below.
Here is just one more variation of this card. On this one I mounted it on a piece of Cocoa cardstock which really frames the focal image. I am submitting this to The Card Concept challenge for this week. I made the following substitutions to their colors: Lime = Pear and Espresso = Cocoa. White is White! I consider this to follow along with their Clean and Layered style.
Thank you so much for stopping by and leaving a comment.
Happy Paper Crafting!
~Angelina
Tuesday, March 11, 2014
A Family Bloosoms With a Mother's Love
This is the first card for this year's Mother's Day series. The sentiment says it all! What would a family be without the love of the Mama that brought each of us into the world?
The sketch for this card comes from Mojo Monday's Sketch 336. I plan on doing a few different cards using this sketch. I used the Ivy Lane Paper Packet, along with my Artiste and Art Philosophy Cricut cartridges and the sentiment is from a Hostess set "A Mother's Love", all from Close to My Heart.
On the next card, I think I will change out some of the papers to create a better contrast. I do love how the flowers and leaves came out, don't you? Both are cut with the Artiste cartridge and then I scored the veins on the leaves to create a more realistic effect.
Here are a few other projects that you can make with this lovely Ivy Lane Paper Packet.
Thank you for stopping by today and I look forward to reading any comments.
In the meantime, Happy Paper Crafting!
~Angelina
The sketch for this card comes from Mojo Monday's Sketch 336. I plan on doing a few different cards using this sketch. I used the Ivy Lane Paper Packet, along with my Artiste and Art Philosophy Cricut cartridges and the sentiment is from a Hostess set "A Mother's Love", all from Close to My Heart.
On the next card, I think I will change out some of the papers to create a better contrast. I do love how the flowers and leaves came out, don't you? Both are cut with the Artiste cartridge and then I scored the veins on the leaves to create a more realistic effect.
Here are a few other projects that you can make with this lovely Ivy Lane Paper Packet.
![]() |
| Ivy Lane Cardmaking Kit |
![]() |
| Ivy Lane Scrapbooking Kit |
![]() | |
| Mojo Monday Sketch 336 |
Thank you for stopping by today and I look forward to reading any comments.
In the meantime, Happy Paper Crafting!
~Angelina
Subscribe to:
Posts (Atom)